HTMLの実装例でGitのブランチ/マージを試してみる
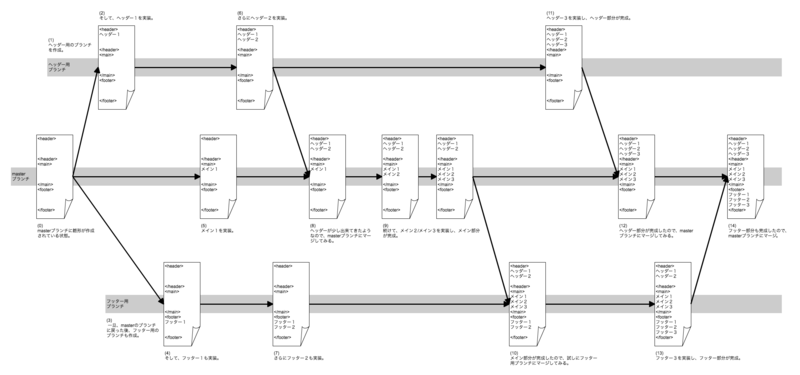
ブランチを使ってHTMLを実装するような想定で、Gitのブランチ/マージを試してみる。
実際にコマンドラインで試してみる
(0) masterブランチに雛形が作成されている状態。
(1) ヘッダー用のブランチを作成。
$ git checkout -b header
(2) そして、ヘッダー1を実装。
$ vi sample.html
$ git commit -a -m "ヘッダー1の実装"
(3) 一旦、masterのブランチに戻った後、フッター用のブランチも作成。
$ git checkout master
$ git checkout -b footer
(4) そして、フッター1も実装。
$ vi sample.html
$ git commit -a -m "フッター1の実装"
(5) メイン1を実装。
$ git checkout master
$ vi sample.html
$ git commit -a -m "メイン1の実装"
(6) さらにヘッダー2を実装。
$ git checkout header
$ vi sample.html
$ git commit -a -m "ヘッダー2の実装"
(7) さらにフッター2も実装。
$ git checkout footer
$ vi sample.html
$ git commit -a -m "フッター2の実装"
(8) ヘッダーが少し出来てきたようなので、masterブランチにマージしてみる。
$ git checkout master
$ git merge header
(9) 続けて、メイン2/メイン3を実装し、メイン部分が完成。
$ vi sample.html
$ git commit -a -m "メイン2の実装"
$ vi sample.html
$ git commit -a -m "メイン3の実装"
(10) メイン部分が完成したので、試しにフッター用ブランチにマージしてみる。
$ git checkout footer
$ git merge master
(11) ヘッダー3を実装し、ヘッダー部分が完成。
$ git checkout header
$ vi sample.html
$ git commit -a -m "ヘッダー3の実装"
(12) ヘッダー部分が完成したので、masterブランチにマージ。
$ git checkout master
$ git merge header
(13) フッター3を実装し、フッター部分が完成。
$ git checkout footer
$ vi sample.html
$ git commit -a -m "フッター3の実装"
(14) フッター部分も完成したので、masterブランチにマージ。
$ git checkout master
$ git merge footer


